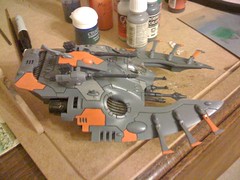
I'm satisfied with the way my Wave Serpent has turned out, so I'm going ahead with my plans to do 1000 points worth of Eldar. If I manage to finish that then I'll keep adding 500 point chunks until I'm at the 2500 point army I have planned.
As I mentioned before, I'm doing a Yme-Loc army (I've decided it's either pronounced eye-meh-lock or im-eh-lock, leaning towards the former). If you look at the photo that inspired me, you'll see that my scheme is quite a bit simpler, but it's still the same basic gray and orange overall. The exact paints I've chosen are as follows:
Interior base coat/primer: Krylon White Primer (for the inside of the transport compartment)
Exeterior base coat/primer: Krylon Gray Primer
Touch up color for base coat: Model Color 869 Basalt Grey (not an exact match, but close enough to do the job)
Light gray panel color: Game Color 50 Cold Grey
Orange panel color: Citadel Foundation Mecharius Solar Orange
Gun barrels/control panel: Model Color 995 German Grey
Engines/intakes: Game Color 51 Chaos Black
Engines/intakes drybrush: Game Color 60 Tinny Tin
Eldar skin: Game Color 4 Elf Skintone
Driver wash: Citadel Wash Bedab Black
Sensors basecoat: Citadel Foundation Orkhide Shade
Sensors highlight: Game Color 29 Sick Green
Sensors midcoat: Game Color 28 Dark Green (only used first time, probably not necessary)
Highlight drybrush: Game Color 49 Stonewall Grey
Blacklining of panels: micron pens
Sealer: Testors Gloss Cote
Using the primer as my base coat cuts down the time on this model a great deal. The only drawback to such a method is finding a good touch up paint, fortunately I had a Model Color that is almost, but not quite, an exact match. It's close enough that I can use it to fix mistakes if I'm careful. This made the whole project possible.
I experimented a bit with the blacklining, trying to use a wash first before breaking down and buying some micron pens which did the job wonderfully. It's one of those things that once I used them I couldn't believe I hadn't been using them all along.
Building the model, about the only way I deviated from the GW instructions was that I glued the bottom half to the top half before painting, leaving the canopy off. This means that my canopy doesn't open up, instead I glued it on after applying the gloss cote, using Testors clear parts cement. This solves two problems for me. First, it allows me to prime the interior, assemble the model, and then prime the exterior without worrying about bleed through to the interior. Second, it allows me to not have to worry about damaging my paint job while assembling the model; a process that involves strapping it together with rubber bands until the glue dries. The drawbacks are that the engines and intakes are a bit trickier to paint, and the canopy won't open and close. I haven't decided yet if I'm going to try the official method with the next one, but probably not.
The plan is to keep the paint scheme the same for all five wave serpents transporting my storm guardians, varying only the placement of orange on the force shield vanes to differentiate them from each other. The three vehicles carrying my fire dragons will be the same as well, but slightly changing the arrangement of light gray and orange panels to differentiate them from the guardian wave serpents. Probably changing the pattern only on the panels around the rear intake, changing the orange panels to light grey and making the top panel orange instead of the base color.
I don't plan on applying any decals or Yme-Loc symbols. The latter would require freehanding, and while I think I could do an ok job, it would add too much time to the project. The same goes for adding any generic eldar decals to the vehicles. The only models I plan to put that kind of effort into will be my autarchs.
One of the biggest experiments for me is leaving the models with a gloss finish. I feel it suits the nature of the eldar vehicles. It also saves a step, but one that's pretty insignificant in terms of time and effort. If I do decide to add a matte finish later I'll have to put some putty on the canopy first.
Eventually I'll try to take some better photos. The one above I took with my phone.


1 comment:
Not much detail...
Post a Comment