Saturday, July 25, 2009

Easiest Conversion Ever - Hydra Flak Tank


There's been a lot of talk about using the quad gun provided in the Aegis Defense Line for converting a Chimera into a Hydra Flak Tank. The Forge World version of the Hydra has a huge quad autocannon mounted onto the back of a Basilisk chassis. The quad autocannon in the Aegis box is only about half as big. This actually makes for an even easier conversion, although it doesn't look at all like the Forge World version. I'm calling it the Aegis pattern Hydra Flak Tank.

You start with the current Chimera kit, fully assembled, and an assembled quad autocannon from the Aegis kit. This assumes that you haven't somehow permanently attached either the turret on the Chimera or the quad gun to its Aegis base.

You're also going to need the bit of sprue from a flying stand, a 40mm, or a 60mm round base. The small cylindrical piece on the side that you have to clip off before using the base. Cut it from the base and use a file to make the piece entirely cylindrical, then glue it to the bottom of the round base of the quad gun. That's it.


Now you can simply remove the Chimera turret and replace it with the quad gun, and you can still put the quad gun back in its original base for use in the defense line, and the turret back on the Chimera for use as a regular Chimera.


Edit: I noticed shortly after posting this that I'd foolishly followed the directions in the box and assembled the barrels upside down. Fortunately, the glue hadn't set, so I was able to take the ammo canisters off and assemble it correctly. Something to be aware of in assembling the gun, but it has no bearing on the conversion.

Trees


I'm rather pleased with how my trees turned out. I did a bit of green stuff on the trunks to fill the major gaps before priming. I had started this months ago, but stopped because of how big a pain it was to prepare the green stuff. This was because it was old and stiff and required a lot of work to mix the two parts, once it was mixed it worked fine, but it simply took too long to get to that point. I finally broke down and got some new green stuff, and was able to finish up the work quickly.

For painting the base piece I followed the same process that I've done for my other terrain: brown base with ochre drybrushing and a mix of static grass on top. For the trees I started with the same brown base, but then used a heavy drybrush of Anita's All Purpose Acrylic 11084 Rainy Day Gray on the bark. I did the leaves on the sprue, using Anita's All Purpose Acrylic 11040 Hunter Green as the base with a moderate drybrushing of Anita's All Purpose Acrylic 11057 Spring Green on top. I then went and did the branches with the same technique I used on the trunk of the tree.

Assembling it is a bit of a pain, and the result is rather fragile. I don't plan on these leaving the house, so they should be OK, but if I were doing these for a store, or for transport, then I probably wouldn't bother with the leaves.

After assembling, I went back and touched up the leaves with the Hunter Green where I'd cut them from the sprue before hitting them with the matte sealer.

Wednesday, July 22, 2009

40K Stuff

I had posted on Facebook that I got my order of rare earth magnets in and was planning on magnetizing my Valkyrie model this past weekend. That didn't happen as I was still on a roll with terrain painting, so instead I got most of the job done on a set of GW woods (I'll write up how I painted them once I get some pictures).

It will probably be another few days yet until I get to the Valkyrie. Today I started back on a couple of Eldar models I'm hoping to have ready by Sunday. Why Sunday? It looks like Sunday is going to be 40K day at Castle House, and this Sunday we're starting our 'non-league escalation league.' Since most of the players are either new, or new to 5th Edition, most of us think it would be a good idea to start small with some 500 point forces to get things going, like in an escalation league, but without the actual league part.

I've already played a 500 point game with my IG, so I figure I'll switch to Eldar for this coming game. The main thing I need to do is put together another flying stand as I intend to use two Wave Serpents in my force, but I'd also like to get my Autarch painted in case I choose to use him as my HQ. That's what I worked on today, getting the base colors and wash done. Tomorrow I hope to finish it up and then hopefully do the basing on Friday.

I'm also expecting my Pig Iron heads to get here tomorrow, so I may end up getting distracted by IG, but I'll probably be able to stick with the Eldar for now.

My one concern about the 500 point 40K games is that they're talking about keeping it at that level for a couple of months, and I really need to boost it to 750 or 1000 to get a feel for what units I need to add to my Imperial Guard army. I just don't have very many options at 500, and feel like I'll be getting bored at that level, and not really learning a lot about my army. If they really want to keep it at 500 then I may have to put together a Space Marine list at that level in order to keep things interesting for me.

Tuesday, July 14, 2009

Oh Look, Skulls!


So, after ranting about too many skulls on the Arcane Ruins kit, I next decided to do the Temple of Skulls. At least you know what you're getting with this one. Seriously though, it's not a bad piece of terrain. It's a little funny that it's marketed as terrain for Warhammer Fantasy Battles though, because I think it makes a better piece of 40K terrain. There are few places where a movement tray is going to fit, but plenty of places to put individual models. Also, the piece is tall enough to provide some serious blockage to line of sight, which is something that's rare on a 40K table due to true line of sight. I'm looking forward to actually having it on a table during a game.

As for how I painted it, I used a combination of the techniques I used on the hill and craters with the techniques I used on the Arcane Ruins. The base uses the former, while the actual ruins use the latter. The main difficulty is deciding where to make the border between the two. after basecoating in Krylon gray primer. I used a combination of logic and ease of painting to decide where to make that border. I then used a tank brush to paint that border in brown, followed by my 2" brush to paint the larger areas. Finally, I went in with a regular large paintbrush to do the small bits where there needed to be some brown.

After the brown was dry, I did my drybrushing, starting with white on the gray areas, followed by ochre yellow on the brown areas. I switched to a 1" brush for this to give me more control over where the paint was going, and used a tank brush where things got really tight.

After the drybrushing was done I applied static grass to parts of the brown area, particularly all along the bottom edge. I decided to use all scorched grass, with no patches of regular grass, given that the coverage was already broken up enough due to the nature of the piece.

Overall, I'm pleased with the result. I could have spent a bit more time on it and gotten the details a bit neater, but as it was it didn't take me much longer to do than the other pieces. I might still go in and do the small skulls in bleached bone and a wash, but otherwise I'm done once I give it a clear coat.

Sunday, July 12, 2009

Easiest Terrain Ever


I've been working on my Arcane Ruins from GW, and I have to say that it has to be the easiest terrain project I've done yet, short of just laying a felt mat onto the tabletop. Primed with Krylon Gray primer, drybrushed with white craft paint, use a matte sealer, and done. I could have used green stuff to try to cover up the joins from the assembly, but that would have multiplied the total amount of time it took to do this project several times over.

I really like the results, although the GW fetish for skulls makes it less useful with non-GW games, or even with Lord of the Rings, which is what I originally got the kit for. I didn't put any of the extra skulls on, but there are more than enough molded right in to make it an obvious GW product. Still, it's a minor point for an otherwise good kit that can be assembled in multiple ways.

Friday, July 10, 2009

Painting GW Terrain

I thought it might be helpful to go through exactly how I did my GW hill and craters. I followed the same general process with each, which was basically the same process suggested by the packaging of the terrain painting kit.

Step 1: Use a 2" brush to cover the entire piece in dark brown. I used the dark brown that came with the terrain painting kit, but in the future will probably switch to a slightly lighter chocolate brown craft paint I found.

Step 2: Also using a 2" brush, drybrush ochre yellow onto the areas that aren't going to be covered with static grass. How heavy a drybrush you use here is just a matter of taste. I did lighter on the hill and a heavier drybrush on the craters. Again, I used the paint that came in the terrain painting kit, but found an ochre yellow craft paint that looks to be nearly a match that I plan on trying in the future.

Step 3: Mix up a roughly 50/50 mix of pva glue/water and paint it over the areas you want to apply the static grass. I used an old GW tank brush for this purpose as I needed a bit better control for this stage in order to avoid getting static grass where I didn't want it. I used two shades of static grass, starting with spots of one by just grabbing a handful and dropping it on the spots I thought looked good, then turning over the terrain and letting the excess fall off onto a piece of newspaper, repeating this until I had the coverage I wanted. I followed by doing the same thing with the second shade, but over a different piece of newspaper so that I could recover the excess grass and keep the shades mostly separate. Once I had the coverage I wanted, I blew lightly over the entire area to help cause the grass to settle into a more upright position.

With the hill, I covered up significant portions of the hill, roughly as shown in the pictures on the box, leaving only the vertical signs, and some other small areas showing. With the craters I only covered up the flat edge to help it blend in to the table.

I followed the GW recommendations of putting spots of the regular grass followed by filling up the rest of the area with scorched grass. I did this with the idea that I'm eventually going to do a complete table in the same manner; however, if you're planning to use the terrain with a standard green flocked mat, such as those made by GW or Monday Knight Productions, then you should probably reverse the ratio, doing spots of scorched grass followed by filling up the rest of the area with regular green grass in order to better match the game mat.

Step 4: Seal it up. I ended up using a couple coats of matte finish. The first was a cheap Krylon matte spray I'd been meaning to experiment with for a while, and when that didn't provide as matte a finish as I'd hoped for, I did a second coat using GW matte.

That's it. Doing the hill and a package of moonscape craters took me about five days from start to finish, but I only actually worked on them for somewhere around three hours total, with the rest of the time just being time between steps for things to dry, or simply having to wait while doing such unimportant things as work and sleep. If I could have cut things down to just waiting for things to dry, then I probably could have gotten them all done in a single day.

Monday, July 06, 2009

Craters


Finished up one of the craters. I'm pleased with how it turned out, although it brings up an issue with the terrain painting kit: not enough ochre paint for the drybrushing. The bottle was only about half-full to begin with, and drybrushing uses it up fast. Even considering that you're only going to be drybrushing the stuff that isn't going to be covered by static grass, I still don't see how there's possibly going to be enough to do a Realm of Battle table.

I may have to find a suitable craft paint substitute just to finish up the craters.

After the craters I'll probably try to work on the Arcane Ruins, which means a trip to the craft store anyway. I'll also probably pick up some compressed air for my new Citadel air brush when I go, so I may get sidetracked in learning how to use that on some of my old IG vehicles.

Terrain Projects

I finally got around to diagnosing and fixing the problem with the fluorescent lights in my garage (a bad ballast). Normally, that would have nothing whatsoever to do with gaming, but the light in question is the one that illuminates the part of the garage that doesn't actually contain automobiles. Instead, it currently contains a bunch of stuff that still hasn't been fully unpacked from our move, a bunch of scrap and junk that was there from before we moved, and a couple of tables that I hope will become my gaming space.

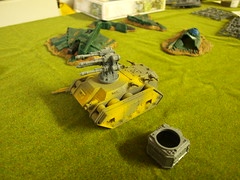
That last bit is the important part for my current project: terrain. I need more of it to have some decent games. I've got a couple of green flocked mats for most games, plus a blue felt one for air and sea battles. I also have a decent, but not overwhelming, supply of terrain for 15mm games (mainly Flames of War), but I lack much in the way of terrain for larger scales (mainly 40K).

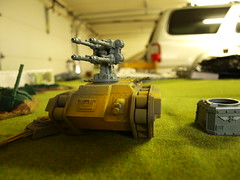
I've been slowly trying to fix that problem by buying the occasional piece of GW terrain. So far, I've got a hill, a woods, an arcane ruins, the moonscape craters, and the new temple of skulls, but some have needed assembly, and they all need to be painted. Since my normal painting area is a Citadel Paint Station, and some of my terrain is as big as the paint station, I haven't been able to get to it before now. Now that I've got a couple of big tables with decent lighting, I've started to fix that.

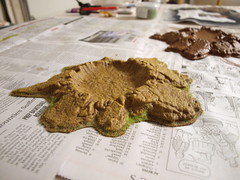
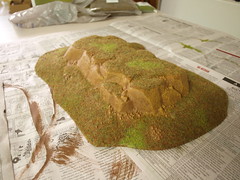
My first project has been the simplest one: painting the Citadel Gaming Hill. A while back, in preparation for this, I purchased a Citadel Scenery Painting Pack. I'm sure it would have been significantly cheaper to just buy some brown and ochre craft paints at a hobby store, but I basically decided to pay for the convenience of getting everything in one package. In theory, there's enough paint, flock, and glue here to cover a 4'x6' Citadel Realm of Battle Gameboard, so I figured it would suffice to do several pieces of terrain.

There are some good and bad points to the pack. You do get a good size jar of brown paint, and a lot of scorched grass flock. The problem with both of them is how they come packaged. The pack comes with a 2" wide paint brush. The bottle of paint comes with a mouth that's smaller than 2". That means you're going to need a palette. The flock comes in a tightly sealed bag that is not re-sealable. You're going to spill some, and you're going to have to find another container to store what's left over. This would have been OK, if I were getting some sort of bulk deal on all of this, but I'm actually paying a premium over what I'd pay at the craft store, so it's a bit disappointing.

Still, the results aren't bad. The colors work well together. The included brush is going to get worn out fast when using it for drybrushing, but 2" brushes are cheap to buy at the hardware store. I haven't actually used the included flock, but it's the same as the flock you get in the Citadel tubs, which is what I'm using now (I'm just going to refill the tubs from the bags when they run out). Leaving out the time it took for the various stages to dry, it probably took less than an hour to finish.


Next up, I'm going to do the moonscape craters using the same method. I'm also going to head to the craft store to get some different colors for doing the arcane ruins and the temple of skulls.

Longer term, I want to do some complete tables. Flocked mats are OK, but I've been wanting to do a full table for Flames of War for a while now. In preparation for that, I ordered a hot knife for cutting foam. After it gets here, I'll be heading to one of the DiY stores to get some foam board. I don't know that I'll start by doing a complete table, I may just do some smaller pieces first, but I want to eventually do three 2'x4' sections that will form a 6'x4' table representing the area around Kharkov in the summer of 1942. Mostly rolling hills with some wooded areas. I'll probably just model the rolling hills into the table, and maybe a road or two, while leaving room for the Battlefield in a Box river to be placed, or for some movable trees to be put down.

If that works out well, then I'll probably work on some other terrain tables as well, but that would be much further down the road.